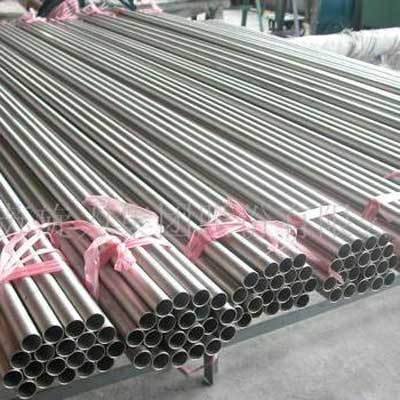
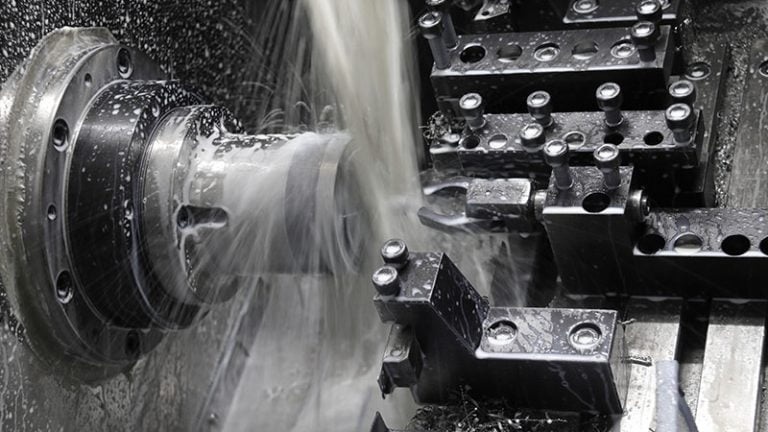
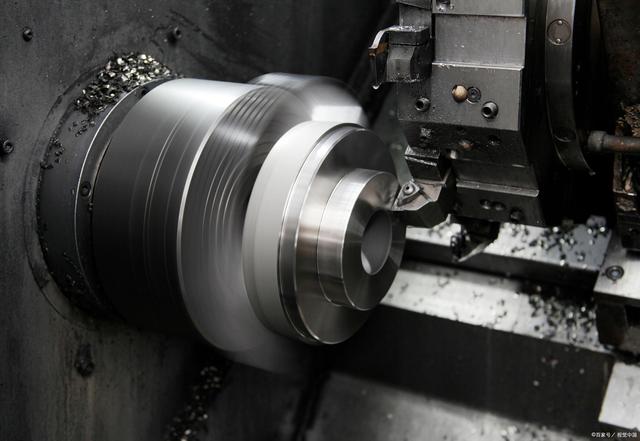
We supply high standard titanium seamless tubes and titanium welded tubes to global buyers.
ASTM B338 Standard Specification for: Seamless and Welded Titanium and Titanium Alloy Tubes for Condensers and Heat Exchangers
1. Scope
1.1 This specification2 covers the requirements for 22 grades of titanium and titanium alloy tubing intended for surface condensers, evaporators, and heat exchangers, as follows:
1.1.1 Grade 1—Unalloyed titanium,
1.1.2 Grade 2—Unalloyed titanium,
1.1.3 Grade 3—Unalloyed titanium,
1.1.4 Grade 7—Unalloyed titanium plus 0.12 to 0.25% palladium,
1.1.5 Grade 9—Titanium alloy (3% aluminum, 2.5% vanadium),
1.1.6 Grade 11—Unalloyed titanium plus 0.12 to 0.25% palladium,
1.1.7 Grade 12—Titanium alloy (0.3% molybdenum, 0.8% nickel),
1.1.8 Grade 13—Titanium alloy (0.5% nickel, 0.05% ruthenium),
1.1.9 Grade 14—Titanium alloy (0.5% nickel, 0.05% ruthenium),
1.1.10 Grade 15—Titanium alloy (0.5% nickel, 0.05% ruthenium),
1.1.11 Grade 16—Unalloyed titanium plus 0.04 to 0.08% palladium,
1.1.12 Grade 17—Unalloyed titanium plus 0.04 to 0.08% palladium,
1.1.13 Grade 18—Titanium alloy (3% aluminum, 2.5% vanadium) plus 0.04 to 0.08% palladium,
1.1.14 Grade 26—Unalloyed titanium plus 0.08 to 0.14% ruthenium,
1.1.15 Grade 27—Unalloyed titanium plus 0.08 to 0.14% ruthenium,
1.1.16 Grade 28—Titanium alloy (3% aluminum, 2.5% vanadium) plus 0.08 to 0.14% ruthenium,
1.1.17 Grade 30—Titanium alloy (0.3% cobalt, 0.05% palladium),
1.1.18 Grade 31—Titanium alloy (0.3% cobalt, 0.05% palladium),
1.1.19 Grade 33—Titanium alloy (0.4% nickel, 0.015% palladium, 0.025% ruthenium, 0.15% chromium),
1.1.20 Grade 34—Titanium alloy (0.4% nickel, 0.015% palladium, 0.025% ruthenium, 0.15% chromium),
1.1.21 Grade 35—Titanium alloy (4.5% aluminum, 2% molybdenum, 1.6% vanadium, 0.5% iron, 0.3% silicon), and
1.1.22 Grade 36—Titanium alloy (45% niobium).
1.2 Tubing covered by this specification shall be heat treated by at least a stress relief as defined in 5.3.
1.3 The values stated in inch-pound units are to be regarded as the standard. The values given in parentheses are for information only.
2. Referenced Documents
2.1 ASTM Standards:
A 370 Test Methods and Definitions for Mechanical Testing of Steel Products
E 8 Test Methods for Tension Testing of Metallic Materials
E 29 Practice for Using Significant Digits in Test Data to Determine Conformance with Specifications
E 120 Test Methods for Chemical Analysis of Titanium and Titanium Alloys
E 1409 Test Method for Determination of Oxygen in Titanium and Titanium Alloys by the Inert Gas Fusion Technique
E 1447 Test Method for Determination of Hydrogen in Titanium and Titanium Alloys by the Inert Gas Fusion Thermal Conductivity Method
3. Terminology
3.1 Lot Definitions:
3.1.1 castings—a lot shall consist of all castings produced from the same pour.
3.1.2 ingot—no definition required.
3.1.3 rounds, flats, tubes, and wrought powder metallurgical products (single definition, common to nuclear and nonnuclear standards.) —a lot shall consist of a material of the same size, shape, condition, and finish produced from the same ingot or powder blend by the same reduction schedule and the same heat treatment parameters. Unless otherwise agreed between manufacturer and purchaser, a lot shall be limited to the product of an 8 h period for final continuous anneal, or to a single furnace load for final batch anneal.
3.1.4 sponge—a lot shall consist of a single blend produced at one time.
3.1.5 weld fittings—definition is to be mutually agreed upon between manufacturer and the purchaser.
4. Ordering Information
4.1 Orders for material to this specification shall include the following information, as required:
4.1.1 Quantity,
4.1.2 Grade number (Section 1),
4.1.3 Diameter and wall thickness (Section 12) (Note 1),
4.1.4 Length (Section 12),
4.1.5 Method of manufacture and finish (Sections 5 and 13),
4.1.6 Restrictive chemistry, if desired (Section 6 and Table 1),
4.1.7 Product analysis, if desired (Section 7 and Table 2),
4.1.8 Special mechanical properties, if desired (Section 8 and Table 3),
4.1.9 Nondestructive tests (Section 11),
4.1.10 Packaging (Section 23),
4.1.11 Inspection (Section 17), and
4.1.12 Certification (Section 21).
NOTE 1—Tube is available to specified outside diameter and wall thickness (state minimum or average wall).
5. Materialsand Manufacture
5.1 Seamless tube shall be made from hollow billet by any cold reducing or cold drawing process that will yield a product meeting the requirements of this specification. Seamless tube is produced with a continuous periphery in all stages of manufacturing operations.
5.2 Welded tube shall be made from flat-rolled product by an automatic arc-welding process or other method of welding that will yield a product meeting the requirements of this specification. Use of a filler material is not permitted.
5.3 Welded/cold worked tube (WCS) shall be made from welded tube manufactured as specified in 5.2. The welded tube shall be sufficiently cold worked to final size in order to transform the cast weld microstructure into a typical equiaxed microstructure in the weld upon subsequent heat treatment. The product shall meet the requirements for seamless tube of this specification.
5.4 The tube shall be furnished in the annealed condition with the exception of Grades 9, 18 and 28, which, at the option of the purchaser, can be furnished in either the annealed or the cold worked and stress relieved condition, defined as at a minimum temperature of 600°F (316°C) for not less than 30 min.
6. Chemical Requirements
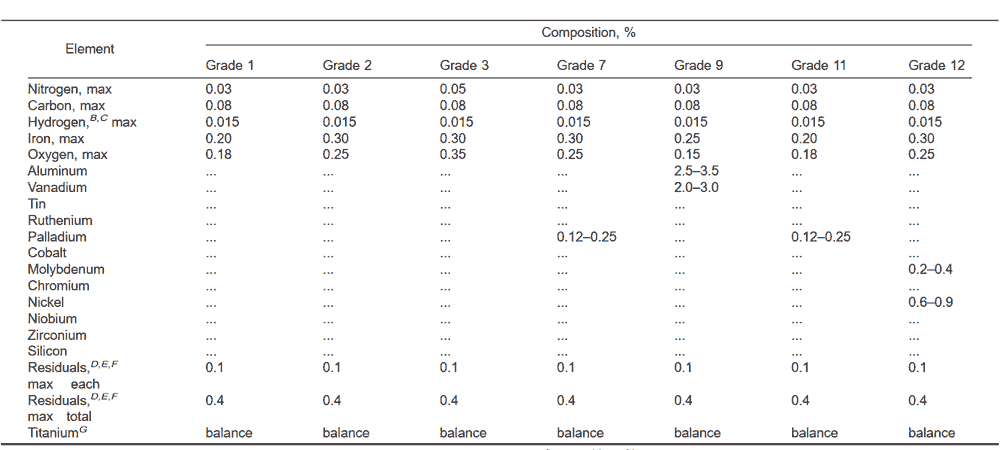
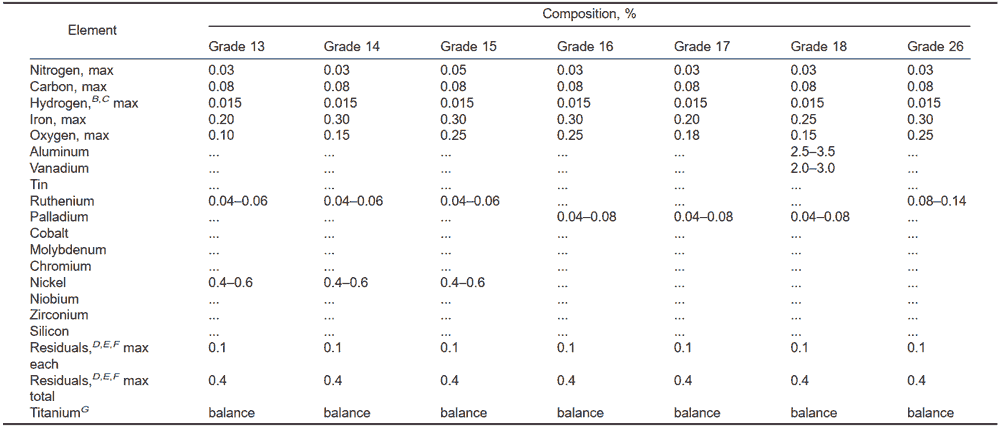
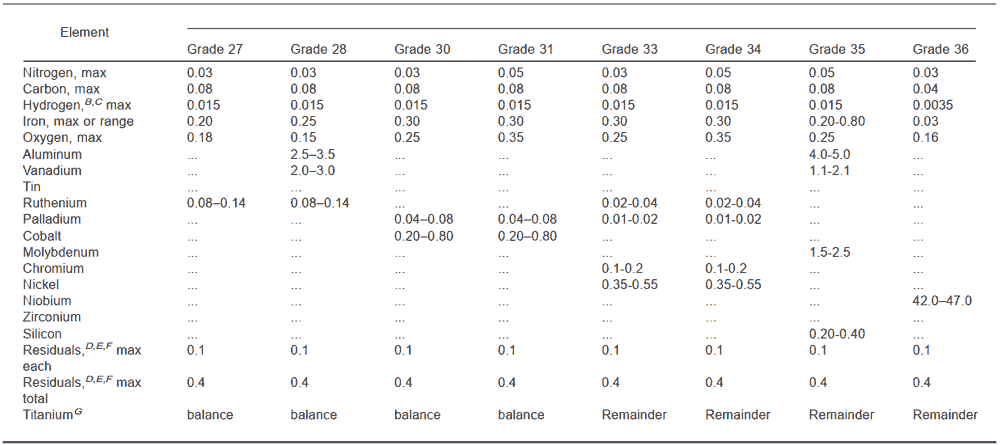
6.1 The titanium shall conform to the chemical requirements prescribed in Table 1.
TABLE 1 Chemical RequirementsA of Titanium Tubes
A Analysis shall be completed for all elements listed in this table for each grade. The analysis results for the elements not quantified in the table need not be reported unless the concentration level is greater than 0.1 % each or 0.4 % total.
BLower hydrogen may be obtained by negotiation with the manufacturer.
CFinal product analysis.
DNeed not be reported.
E A residual is an element present in a metal or an alloy in small quantities and is inherent to the manufacturing process but not added intentionally. In titanium these elements include aluminum, vanadium, tin, chromium, molybdenum, niobium, zirconium, hafnium, bismuth, ruthenium, palladium, yttrium, copper, silicon, cobalt, tantalum, nickel, boron, manganese, and tungsten.
FThe purchaser may, in his written purchase order, request analysis for specific residual elements not listed in this specification.
GThe percentage of titanium is determined by difference.
6.1.1 The elements listed in Table 1 are intentional alloy additions or elements that are inherent to the manufacture of titanium sponge, ingot, or mill product.
6.1.2 Elements intentionally added to the melt must be identified, analyzed, and reported in the chemical analysis.
6.2 When agreed upon by the producer and the purchaser and requested by the purchaser in the written purchase order, chemical analysis shall be completed for specific residual elements not listed in this specification.
7. Product Analysis
7.1 When requested by the purchaser and stated in the purchase order, product analysis for any elements listed in Table 1 shall be made on the completed product.
7.1.1 Elements other than those listed in Table 1 are deemed to be capable of occurring in the grades listed in Table 1 by, and only by way of, unregulated or unanalyzed scrap additions to the ingot melt. Therefore, product analysis for elements not listed in Table 1 shall not be required unless specified and shall be considered to be in excess of the intent of this specification.
7.2 Product analysis tolerances, listed in Table 2, do not broaden the specified heat analysis requirements, but cover variations between different laboratories in the measurement of chemical content. The manufacturer shall not ship the finished product that is outside the limits specified in Table 1 for the applicable grade.
TABLE 2 Permissible Variations in Product Analysis of Titanium Tubes

AA residual is an element present in a metal or an alloy in small quantities inherent to the manufacturing process but not added intentionally. In titanium these elements include aluminum, vanadium, tin, iron, chromium, molybdenum, niobium, zirconium, hafnium, bismuth, ruthenium, palladium, yttrium, copper, silicon, cobalt, tantalum, nickel, boron, manganese, and tungsten.
8. Tensile Requirements
8.1 The room temperature tensile properties of the tube in the condition normally supplied shall conform to the requirements prescribed in Table 3. Mechanical properties for conditions other than those given in this table may be established by agreement between the manufacturer and the purchaser. (See Test Methods E 8.)
TABLE 3 Tensile Requirements of Titanium Tubes

AProperties for material in the annealed condition.
BProperties for cold-worked and stress-relieved material.
CElongation for welded tubing manufactured from continuously cold rolled and annealed strip from coils for Grades 9, 12, and 18 will be 12 %.
9. Flattening Test
9.1 Tubing shall withstand, without cracking, flattening under a load applied gradually at room temperature until the distance between the load platens is not more thanHin.His calculated as follows:
H, in. (mm)=(1+e)t/(e+t/D) (1)
where:
H = the minimum flattened height, in. (mm),
t = the nominal wall thickness, in. (mm), and
D = the nominal tube diameter, in. (mm).
For Grades 1, 2, 7, 11, 13, 14, 16, 17, 26, 27, 30, and 33:
e =0.07 in. for all diameters (2)
For Grade 3, 31, and 34:
e=0.04 through 1 in. diameter (3)
e =0.06 over 1 in. diameter (4)
For Grades 9, 12, 15, 18, 28, 35, and 36:
eshall be negotiated between the producer and the purchaser
9.1.1 For welded tubing, the weld shall be positioned on the 90 or 270° centerline during loading so as to be subjected to a maximum stress.
9.1.2 When low D-to-t ratio tubular products are tested, because the strain imposed due to geometry is unreasonably high on the inside surface at the six and twelve o’clock locations, cracks at these locations shall not be cause for rejection if the D-to-t ratio is less than ten (10).
9.2 The results from all calculations are to be rounded to two decimal places. Examination for cracking shall be by the unaided eye.
9.3 Welded tube shall be subjected to a reverse flattening test in accordance with Supplement II of Test Methods and Definitions A 370. A section of the tube, approximately 4 in. (102 mm) long, that is slit longitudinally 90° either side of the weld, shall be opened and flattened with the weld at the point of maximum bend. No cracking is permitted.
10. Flaring Test
10.1 For tube 31⁄2 in. (88 mm) in outside diameter and smaller, and 0.134 in. (3.4 mm) in wall thickness and thinner, a section of tube approximately 4 in. (102 mm) in length shall withstand being flared with a tool having a 60° included angle until the tube at the mouth of the flare has been expanded in accordance with Table 4. The flared end shall show no cracking or rupture visible to the unaided eye. Flaring tests on larger diameter tube or tubing outside the range of Table 4 shall be as agreed upon between the manufacturer and the purchaser.
TABLE 4 Flaring Requirements of Titanium Tubes

11. Nondestructive Tests
11.1 Welded tubing shall be tested using both a nondestructive electromagnetic test and an ultrasonic test as described in 11.2.1 and 11.2.2. Seamless and welded/cold worked tubing shall be tested using an ultrasonic test as described in 11.2.1.3.
11.1.1 Welded or seamless tubing shall be tested with a hydrostatic or pneumatic test as described in 11.3 or 11.4.
11.2 Nondestructive Electric or Ultrasonic Testing:
11.2.1 In order to accommodate the various types of nondestructive testing equipment and techniques in use, and the manufacturing methods employed, the following calibration standards shall be used to establish the minimum sensitivity level for rejection. For welded tubing, the artificial defects shall be placed in the parent metal.
11.2.1.1 Electromagnetic Testing—A drilled hole not larger than 0.031 in. (0.787 mm) in diameter shall be drilled completely through the skelp (for welded tube) or radially and completely through the tube wall (welded tube), with care being taken to avoid distortion of the tube while drilling.
11.2.1.2 Ultrasonic Testing (Welded Tubing)—A longitudinal notch 0.031 in. (0.787 mm) or less in width and 0.5 in. (12.7 mm) or less in length shall be machined on a radial parallel to the tube axis on the outside and inside of the tube. The notch depth shall not exceed 10% of the nominal wall of the tube or 0.004 in. (0.102 mm), whichever is greater. The length of the notch shall be compatible with the testing method, and the notches shall be located 180 degrees from the weld.
11.2.1.3 Ultrasonic Testing (Seamless and Welded/Cold Worked Tubing), Longitudinal and transverse notches not exceeding 0.010 in. (0.25 mm) in width and 10% of the nominal tube wall or 0.004 in. (0.102 mm), whichever is greater, in depth shall be machined on the inner and outer surfaces of the tube. The length of the notches shall not exceed 0.125 in. (3.18 mm).
11.2.2 Any tubes showing an indication in excess of that obtained from the calibration standard shall be set aside and be subject to rework, retest, or rejection. A tube thus set aside may be examined further for confirmation of the presence of a defect and may be resubmitted for inspection if no defect is found. Any tube may also be resubmitted for inspection if reworked so as to remove the defect within the specified diameter, and wall thickness tolerances are established from Table 5 (rework by weld repair is not permitted).
11.3 Hydrostatic Test:
11.3.1 Each tube so tested shall withstand, without showing bulges, leaks, or other defects, an internal hydrostatic pressure that will produce in the tube wall a stress of 50% of the minimum specified yield strength at room temperature. This pressure shall be determined by the equation:
P=SEt/(Ro-0.4t)
where:
P = minimum hydrostatic test pressure, psi (or MPa),
S = allowable fiber stress of one half the minimum yield strength, psi (or MPa),
t = wall thickness, in. (or mm),
Ro = outside tube radius, in. (or mm),
E = 0.85 welded tube, and
E = 1.0 seamless and welded/cold worked tube.
11.3.2 The maximum hydrostatic test pressure shall not exceed 2500 psi (17.2 MPa) for sizes 3 in. (76 mm) and under, or 2800 psi (19.3 MPa) for sizes over 3 in. Hydrostatic pressure shall be maintained for not less than 5 s. When requested by the purchaser and so stated in the order, tube in sizes 14 in. (356 mm)indiameter and smaller shall be tested to one and one half times the specified working pressure, provided the fiber stress corresponding to those test pressures does not exceed one half the minimum specified yield strength of the material as determined by the equation given in 11.3. When one and one half times the working pressure exceeds 2800 psi (19.3 MPa), the hydrostatic test pressure shall be a matter of agreement between the manufacturer and purchaser.
11.4 Pneumatic Test— Each tube so tested shall withstand an internal air pressure of 100 psi (0.69 MPa), minimum, for 5 s, minimum, without showing evidence of leakage. The test method used shall permit easy detection of any leakage by using the pressure differential method or by placing the tube under water. Any evidence of leakage shall be cause for rejection of that tube.
12. Permissible VariationinDimensions
12.1 Variations in dimensions from those specified shall not exceed the amounts prescribed in Table 5.
TABLE 5 Permissible Variations in Outside Dimensions Based on Individual Measurements of Titanium Tubes

AThese permissible variations in outside diameter apply only to tubes as finished at the mill before subsequent swaging, expanding, bending, polishing, or other fabricating operations.
BWhen minimum wall tubes are ordered, tolerances are all plus and shall be double the values shown.
12.2 Length—When tube is ordered cut to length, the length shall not be less than that specified, but a variation of 1⁄8 in. (3.2 mm) will be permitted on tube up to 24 ft (7.3 m) inclusive. For lengths over 24 ft (7.3 m), an additional over tolerance of 1⁄8 in. (3.2 mm) for each 10 ft (3.05 m) or fraction thereof shall be permissible up to 1⁄2 in. (13 mm) maximum.
12.3 Straightness— The tube shall be free of bends or kinks, and the maximum uniform bow shall not exceed the values given in Table 6.
TABLE 6 Straightness of Titanium Tubes

12.4 SquarenessofCut—The angle of cut of the end of any tube may depart from square by not more than 0.016 in./in. of iameter.
12.5 OutsideDiameter:
12.5.1 Welded Tubes— The outside diameter of welded tubes shall not vary from that specified by more than the amounts given in Table 5 as measured by “go” and “no go” ring gages. The dimensions of the ring gage shall be as described in 12.5.1.1. For tube diameters not listed in Table 5, the dimensional tolerances shall be as agreed upon by the purchaser and the manufacturer or supplier.
12.5.1.1 The inside diameter dimension of the “go” ring gage shall be equal to the nominal tube diameter plus the plus tolerance plus 0.002 in. The length of the “go” ring gage shall be the larger of 1 in. (25.4 mm) or the tube diameter.
12.5.1.2 The inside diameter dimension of the “no go” ring gage shall be equal to the nominal tube diameter minus the minus tolerance. The length of the “no go” ring gage shall be the larger of 1 in. or the nominal tube diameter.
12.5.2 SeamlessandWelded/ColdWorkedTubes—The outside diameter of seamless and welded/cold worked tubes shall not vary from that specified by more than the amounts given in Table 5 as measured by any method agreed upon between the purchaser and the manufacturer or supplier. For tube diameters not listed in Table 5, the dimensional tolerances shall be as agreed upon by the purchaser and the manufacturer or supplier.
13. Finish
13.1 The finished tube shall be clean and free of foreign material, shall have smooth ends free of burrs, and shall be free of injurious external and internal imperfections. Minor defects may be removed, provided the dimensional tolerances of Section 12 are not exceeded.
14. Number of Tests
14.1 One sample shall be selected from lots of 5000 ft (1600 m)or For lots greater than 5000 ft (1600 m), one sample shall be selected from the first 5000 ft (1600 m), and one additional sample shall be selected from each additional 5000 ft (1600 m) or less in the lot. Samples are to be selected at random, and in no case shall more than one sample be taken from a single tube length. The size of the lot may be either the manufactured lot or the purchased lot at the manufacturer’s option.
14.1.1 Chemical composition of the lot shall be the ingot manufacturer’s analysis, except for hydrogen, which shall be determined on each sample from the lot.
14.1.2 One tension test shall be made on each sample.
14.1.3 One flattening test in accordance with 9.1 shall be made on each sample.
14.1.4 One reverse flattening test in accordance with 9.3 shall be made on each sample.
14.1.5 One flaring test in accordance with 10.1 shall be made on each sample.
14.2 If any test specimen shows defective machining or develops flaws due to preparation, the specimen may be discarded and another substituted.
14.3 If the percent of elongation of any tension test specimen is less than that specified in 8.1, and any part of the fracture is more than 3⁄4 in. (19 mm) from the center of the gage length as indicated by scratches marked on the specimen before testing, the specimen may be discarded and another substituted.
14.4 Each length of finished tube shall be examined by the nondestructive test specified in 11.1.
15. Retests
15.1 If the results of any chemical or mechanical property test lot are not in conformance with the requirements of this specification, the lot may be retested at the option of the manufacturer. The frequency of the retest will double the initial number of tests. If the results of the retest conform to the specification, the retest values will become the test values for certification. Only original conforming test results or the conforming retest results shall be reported to the purchaser. If the results for the retest fail to conform to the specification, the material will be rejected in accordance with Section 20.
16. Test SpecimensandMethodsofTesting
16.1 The test specimens and the tests required by this specification shall conform to those described in Test Methods and Definitions A 370.
16.2 All routine mechanical tests shall be made at room temperature.
16.3 The chemical analysis shall be conducted by the standard techniques normally utilized by the manufacturer and the purchaser. In case of disagreement, Test Methods E 120 shall be used as the referee method except for carbon, oxygen and hydrogen, which are not covered in Test Methods E 120. Test Method E 1409 shall be used as a referee method for oxygen, and Test Method E 1447 shall be used as a referee method for hydrogen.
17. Inspection
17.1 All tests and inspection required by this specification shall be made at the place of manufacture prior to shipment and at the manufacturer’s expense unless otherwise specified, and shall be so conducted as not to interfere unnecessarily with the operation of the works. When specified in the order, the manufacturer shall notify the purchaser in time so that the purchaser may have his inspector present to witness any part of the tests that may be desired.
17.2 When agreed upon in writing between the manufacturer and the purchaser, a certification that the material conforms to the requirements of this specification shall be the basis for acceptance of the material. Otherwise, the manufacturer shall report to the purchaser or his representative the results of the chemical analyses and mechanical tests made in accordance with this specification.
18. Rounding-Off Procedure
18.1 For purposes of determining conformance with the specifications contained herein, an observed or calculated value shall be rounded off to the nearest “unit” in the last right-hand ignificant digit used in expressing the limiting value. This is in accordance with the round-off method of Practice E 29.
19. Referee Test andAnalysis
19.1 In the event of disagreement between the manufacturer and the purchaser on the conformance of the material to the requirements of this specification, a mutually acceptable referee shall perform the tests in question. The referee’s testing shall be used in determining conformance of the material to this specification.
20. Rejection
20.1 Material not conforming to this specification or to authorized modifications shall be subject to rejection. Unless otherwise specified, rejected material may be returned to the manufacturer at the manufacturer’s expense, unless the purchaser receives within 3 weeks of notice of rejection other instructions for disposition.
21. Certification
21.1 If so requested by the purchaser, the manufacturer shall supply at least one copy of his report certifying that the material supplied has been inspected and tested in accordance with the requirements of this specification and that the results of chemical analysis and mechanical tests meet the requirements of this specification for the appropriate grade.
22. Product Marking
22.1 Each length of tube 1⁄2 in. (13 mm) in outside diameter and larger, manufactured in accordance with this specification, shall be legibly marked, either by stenciling, stamping, or rolling, with the manufacturer’s private identifying mark, the ASTM designation, the tube class, the grade, and heat number. On smaller than 1⁄2 in. outside diameter tubing that is bundled, the same information may be legibly stamped on a metal tag securely attached to each bundle.
23. Packaging and PackageMarking
23.1 The tube shall be packaged in accordance with the manufacturer’s standard practice, unless otherwise agreed upon between the manufacturer and the purchaser and so stated in the purchase order.
24. Keywords
24.1 seamless tubing; titanium; titanium alloy; tubing; welded/cold worked tubing; welded tubing
